If you are looking for a way to grow your email list in order to generate more leads for your website or to boost up your small scale business, then this article would help you to do that. In this article, Let’s see How to Easily Boost Your Email List with Content Locking.
So, How to do that?. Content Locking!!!. Yes, one of the easiest ways to grow your email list and also it helps you to generate leads for your small business. Do you know? it can be done by using the content you are already publishing. This strategy works for a variety of content, including popular posts.
You may ask me How we are going to do this?. I have a solution, this content locking can be done by the OptinMonster plugin. Yes!! you heard it right. With the OptinMonster content lock, you can improve the lead quality by using gated content to attract qualified leads. Check out the OptinMonster plugin and its features below,
If you are new to here, you may be wondering What’s content locking? and how it’s going to help the bloggers and small business to grow their email list. So, before entering into How to Easily Boost Your Email List with Content Locking, I would like to explain to you about Content locking and its uses.
List of Contents
What’s Content Locking and How Will it help the Small business Marketers and bloggers?
Content Locking is a popular way or strategy used by bloggers for their blog posts and really long articles in order to gain more subscribers. Let me tell you more about it!!!.
Imagine you have put a lot of work in order to generate a content/blog post. You can reach out to more people by sharing it for free, but will you get something in return?. I would not suggest this to be used all the times but in order to gain more subscribers, you can use it for the articles which you consider to be worth and important.

This strategy usually works for a variety of contents, including your popular posts, If you own a blog or a business, you would probably know what’s your audience are interested in. You could find out which products of yours or article of yours sells high. So with that power, you can easily use your existing content or product to grow your email list.
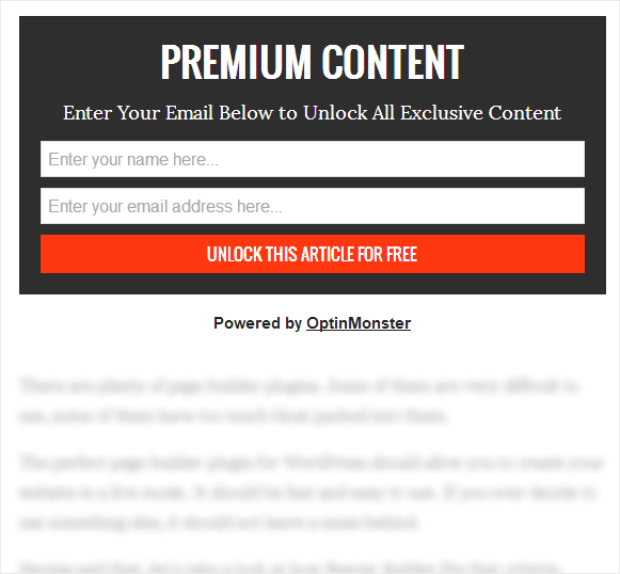
You also have the option to show your viewers an interesting piece of your articles by making the first few paragraphs visible which helps the readers to get to know about what’s your article is about. If they are still interested, they can unlock it by subscribing to your website for payment or for free.
How to Easily Boost Your Email List with Content Locking
I hope you got an Idea of How Content locking works. So, Now let’s get into the next step How to Easily Boost Your Email List with Content Locking. As I mentioned above, You need the OptinMonster plugin to implement this process. Follow the below steps in order to Boost your Email list with content locking.
Step 1 – Install and Activate Plugin
Install and Activate the OptinMonster Plugin from the WordPress repository and connect it to your OptinMonster account. For this, you require an active license of the pro or plus version. To finish up the install process connect your OptinMonster account with your website.
Step 2 – Create an Inline/After post Optin Form
Now, Click create New campaign from your OptiMonster dashboard.

Now, select the In-line or the After post as the Optin type. OptinMonster offers different campaigns types, including Floating bar, Fullscreen, Slide-in, but to create a content lock campaign, we will need to select Inline/Afterpost campaign. After selecting this, you will be displayed with various template designs from which you can select anything you want, but for the sake of example, I would like to go with the basic template design.

After you Name your campaign and assign it to a website, your Basic template will be available in the editor.

Step 3 – Edit your Optin
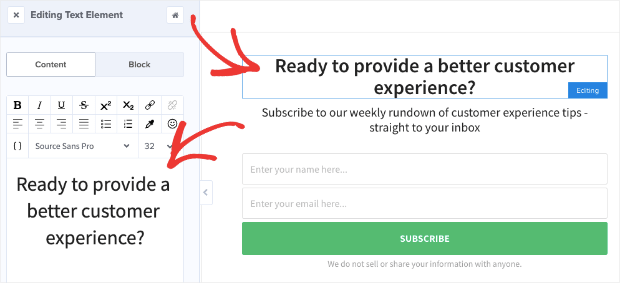
Alright, now you are set. It’s time to customize your Optin. With OptinMonster templates, you can easily customize the Optin’s text, colours, images, fonts, and other settings.

You have to be keen on telling your visitors that your content is for subscribers only so that it would entice them to sign up to your newsletter so that they can read the rest of the content. Remember if you are using the words like “Exclusive”, or “secret” it will act as a high-converting Optin.
Step 3 – Set up Content Lock and choose Content blocking method
After customizing your Optin all you need to do is head up to setting up the content lock. To configure content blocking for your Optin, click the Inline settings tab in the left-hand side menu of the campaign builder.

Now, Toggle the content locking button from red to green,

You will be displayed with 2 blocking methods. One is Obfuscation and the other one is the Removal. Obfuscation blurs out the text below the Optin and the Removal removes the text completely below the Optin.

Step 4 – Choose Your Display Rules
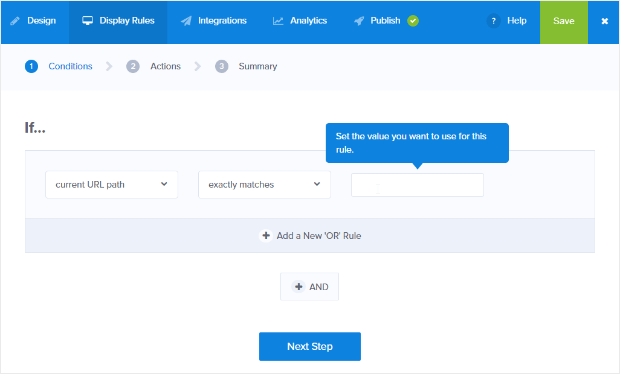
Now, go to Display rules. After you set your basic conditions, we have to set the optin to display when the content URL path exactly matches the URL of the page where we want the campaign to display.

Now, remember that some users may have already engaged with your post by signing up. So, they should still able to view your content. For that, you can enable visitor has viewed ‘X’ pages and set the number to 2 or more.

Step 5 – Add your Integration
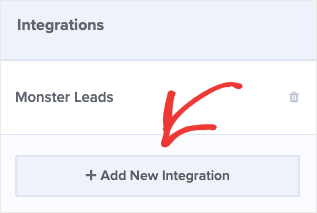
After setting up the rules, all you have to connect the Optin to your email marketing service in order to collect subscriber data. To do this, go to Integrations at the top of the editor.

Now, select Add New Integration.

Choose from the wide range of email marketing service available on the list.

Then, follow the prompts to connect your email provider with OptinMonster. Don’t forget to save the changes to your form.
Step 6 – Save and Publish
It’s time to Save and publish. There will be a button at the top right named as Publish. Click on it and follow the following steps.
Grab the embed code and paste it into your post(for other sites) but if you are using WordPress website, got to dashboard. You can get the Optin’s slug under the Live link.

Add this to the place where it shows Text “SLUG” to create a shortcode which you can embed in your content.
[optin-monster-shortcode id=”SLUG”]
Conclusion
OptinMonster helps you to monetize your website with this content lock feature and also it allows you to collect revenue from locked content with a custom HTML integration. OptinMonster works on all platforms which helps us to enable the web page locker on WordPress or any other CMS(content management system). So check out OptinMonster for more offers with the below link.
With the content locking feature from OptinMonster, you could generate some good lead quality by using gated content to attract qualified leads. Now, you know How to Easily Boost Your Email List with Content Locking. All the best and keep going!!!.
To see more articles on WordPress, Tech, Travel and more Do sign up to my Newsletter.
Like this Post? Do share it with your friends
Continue reading my posts on-
- How did I start blogging?
- How to Start a Blog? Doesn’t know where to start?
- How to Create a WordPress Order Form With Online Payments
- Travel, Thunderbird and Coffee
- Console Wars 2020 [Xbox Series X VS Ps5]
- 4 Most powerful and useful WordPress Tools
- Chennai to Bangalore Road Trip
- Thalli Pogadhey (Chennai to Pondicherry Road trip)
- How to Install Google Analytics in WordPress by MonsterInsights


Leave a Reply