What if I told you that, you can connect your WordPress website to the Salesforce?.Sounds Perfect right?.. In this article, I would like to explain to you about How to Connect WordPress Website Leads And Salesforce (CRM).
WPForms has introduced a new plugin which can actually integrate your WordPress website with the salesforce CRM. This addon will automatically let you to send form entries from WPForms to Salesforce CRM. It’s Automated so you won’t need a manual admin to do that for you.
I believe many users have been copying the data from your form entries to Salesforce. But with this WPForms addon, you could do that easily and also this helps you to save some of your money because you don’t need to pay extra for a service like Zapier which would help you connect your WordPress website to Salesforce CRM.
If you are new, You may ask why should we use Salesforce?. I’ll tell you why… Salesforce is one of the best Customer Relationship Management software(CRM) available in the market. Are you interested in creating objects in Salesforce when your forms are submitted?… You should just add the WPForms addon and the rest is taken care of by WPForms. Before we discuss How to Connect WordPress Website Leads And Salesforce (CRM), let’s see about How to automatically create Salesforce objects.
Remember to add the WPForms Plugin and the addon before starting to do this process. To do that, It’s just a click away… Click on the below link in order to purchase the WPForms.
How to Automatically Create Salesforce Objects
To Automatically create Salesforce objects you would need to select the object you want to create in the settings for your form, like the below image,
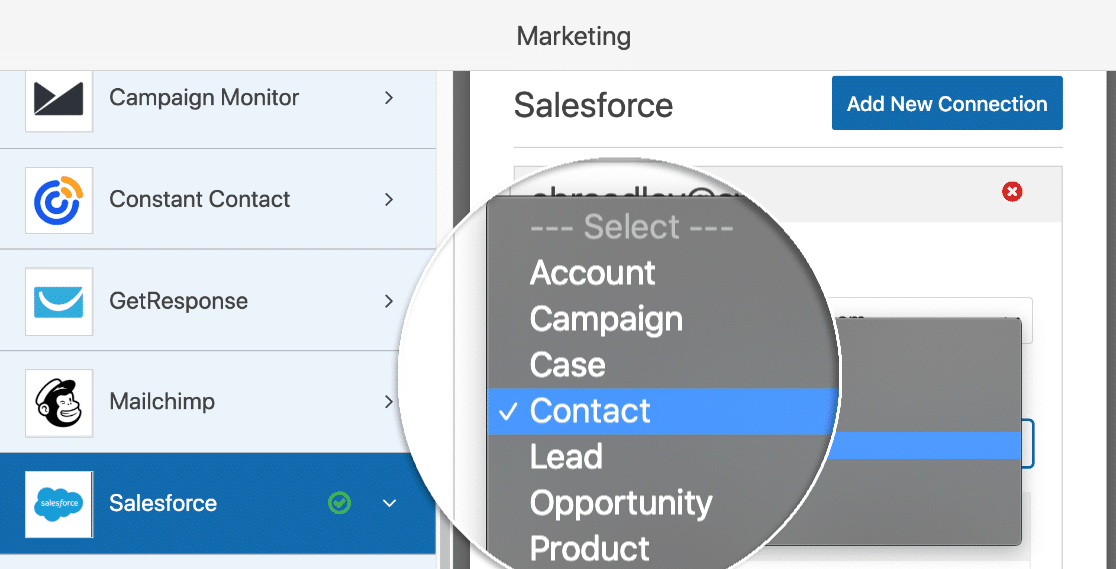
With this, you could create a new lead from each and every submission else you can use an internal form in order to quickly add new salesforce accounts. Alright, once you have chosen your object, you are half work is done. Now, you need to map the fields in your form to the fields present in the Salesforce object. There are many ways to create an object with the WPForms Add-on plugin. With WPForms Addon your workflow could be made faster and efficient.
Now you have chosen the object you want to create, Let’s map the fields in your form to the fields in Salesforce.

You can also use the conditional logic if you wish to take control of which entries are sent to Salesforce.

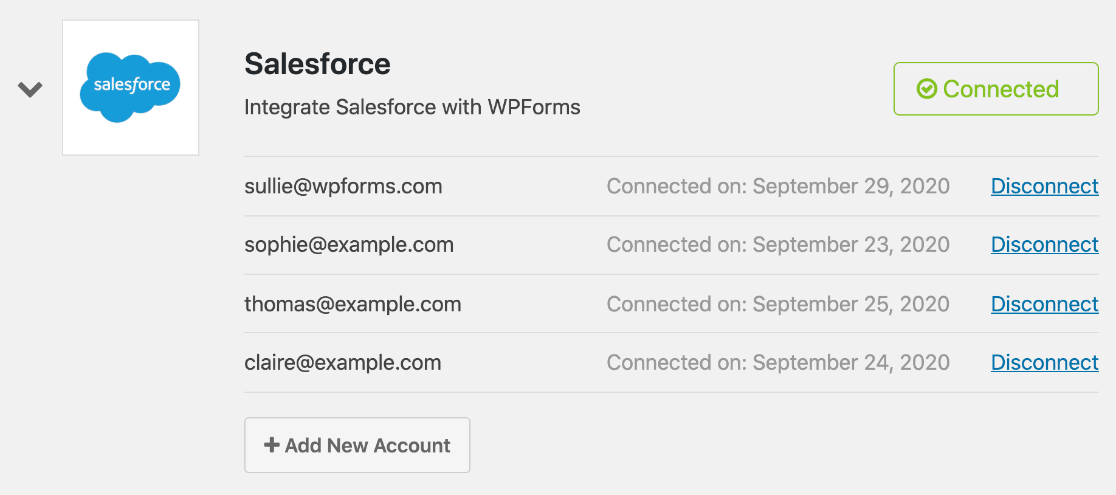
There you go!!. Now you don’t need to copy-paste your form entry data’s, so you don’t need to hire someone to manually copy paste the records. One last thing you should know is that with WPForms you can connect any form you wish to Salesforce CRM and also you can add multiple Salesforce accounts if you need to.
Alright, now can we see How to Connect WordPress Website Leads And Salesforce.
How to Connect WordPress Website Leads And Salesforce
I would suggest you follow the below steps in order to achieve the process.
Step 1 – Installing the Salesforce Addon
Before setting up things you should install the WPForms plugin. After installing the WPForms, you should install and activate the Salesforce addon. If you already have the WPForms, then you should add the Salesforce addon from the addon section. In order to add the Salesforce plugin check the below link to get the addon. Also, I would like to inform you that this Salesforce addon comes with the WPForms elite plan.
Step 2 – Creating a New App in Salesforce
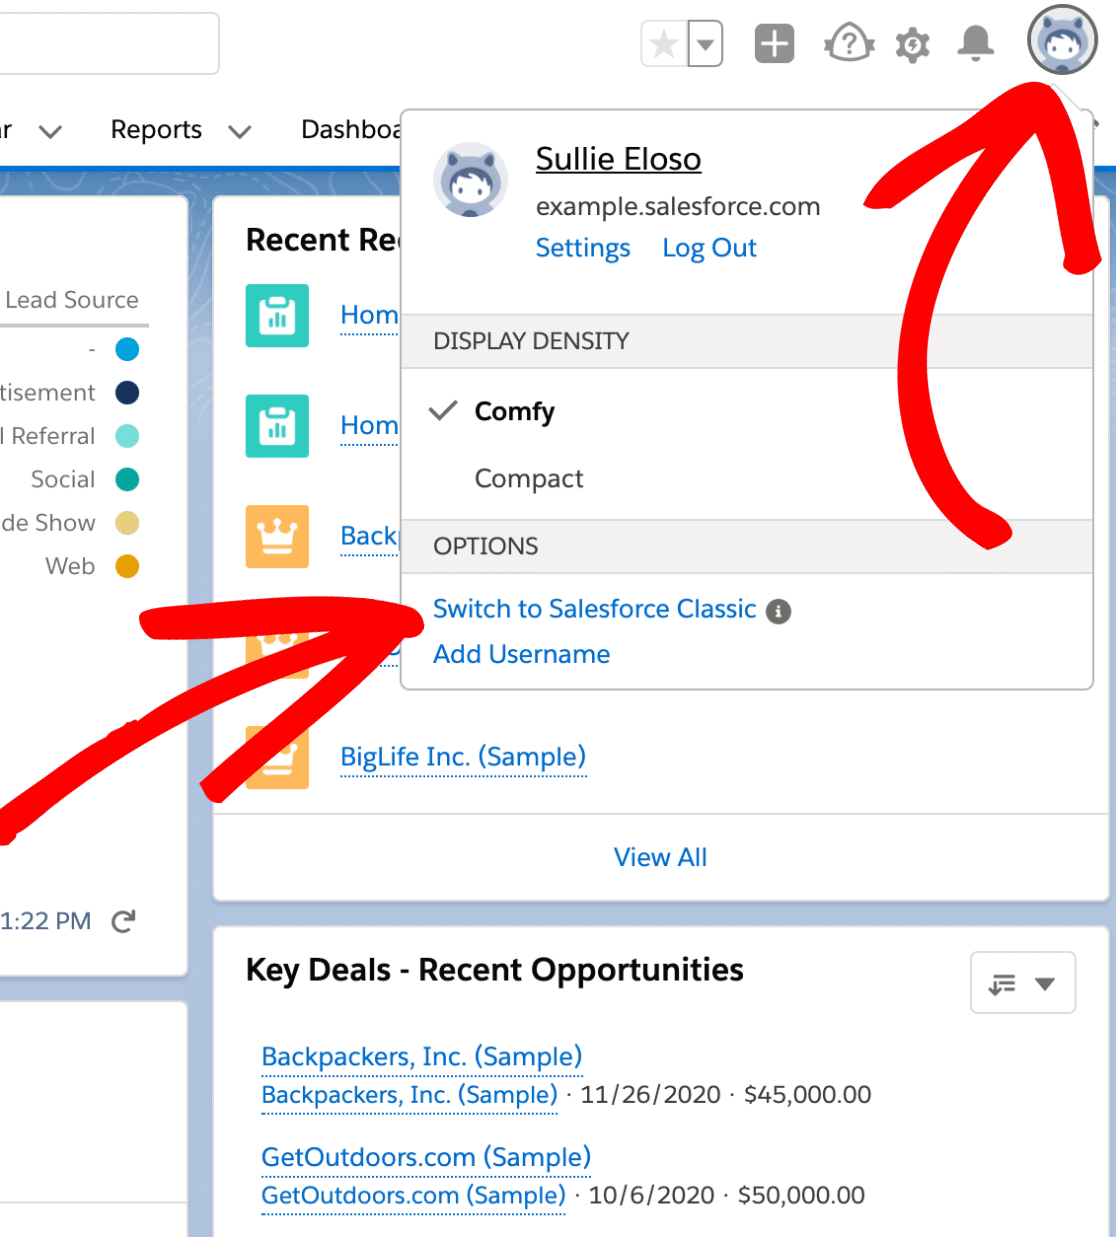
We are set up and yes, let’s begin. You will need to create an app within your Salesforce account in order to connect WPForms with Salesforce. Remember to start this process you need a Salesforce account. After creating it, I suggest you log in and follow my steps. Make sure that you are using your Salesforce Classic dashboard. If you. don’t know where to switch that, click on your profile icon in the upper-right corner and then choose the Switch to Salesforce Classic option.
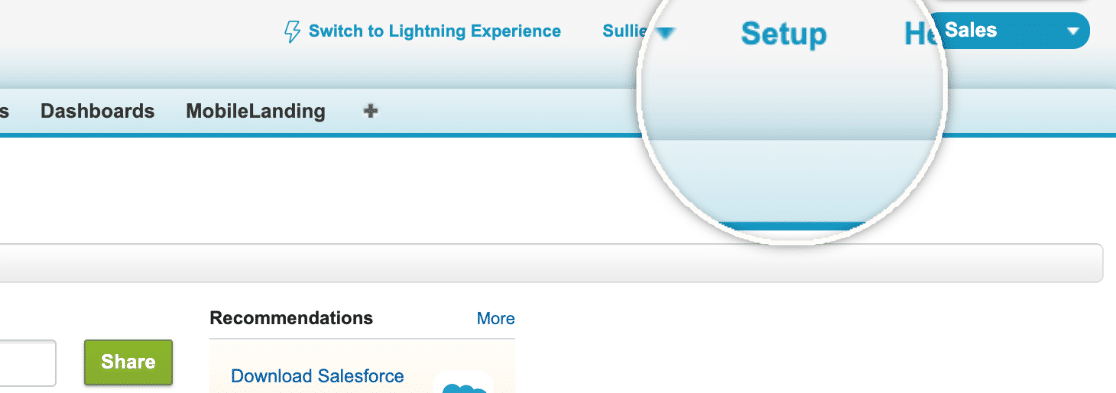
After you have switched to the Classic dashboard, go to the navigation bar and click on the Setup tab.
Now, you can use the Quick Find or the Search bar present in the left panel to search for apps. From those options, you can begin to build a new app by selecting Build→Create→Apps.
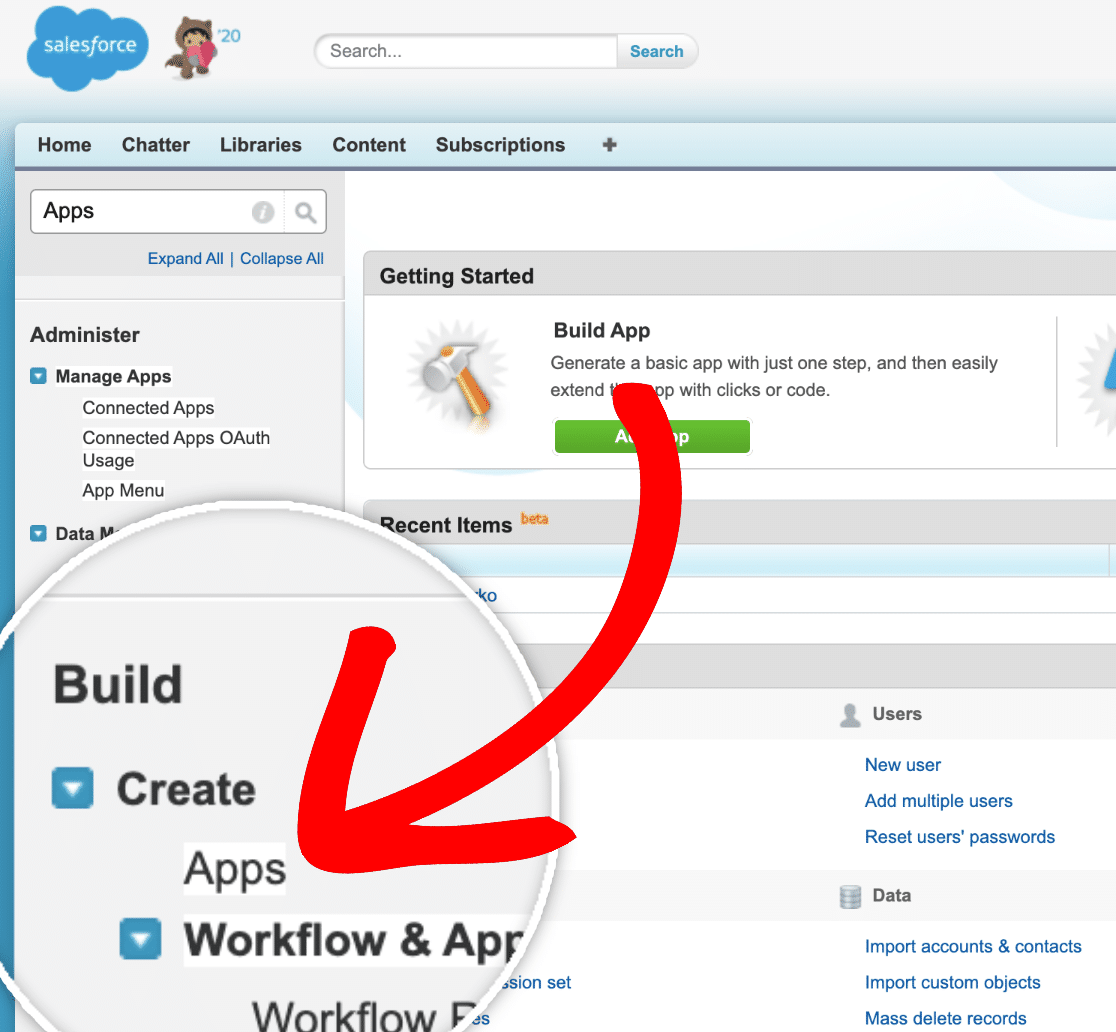
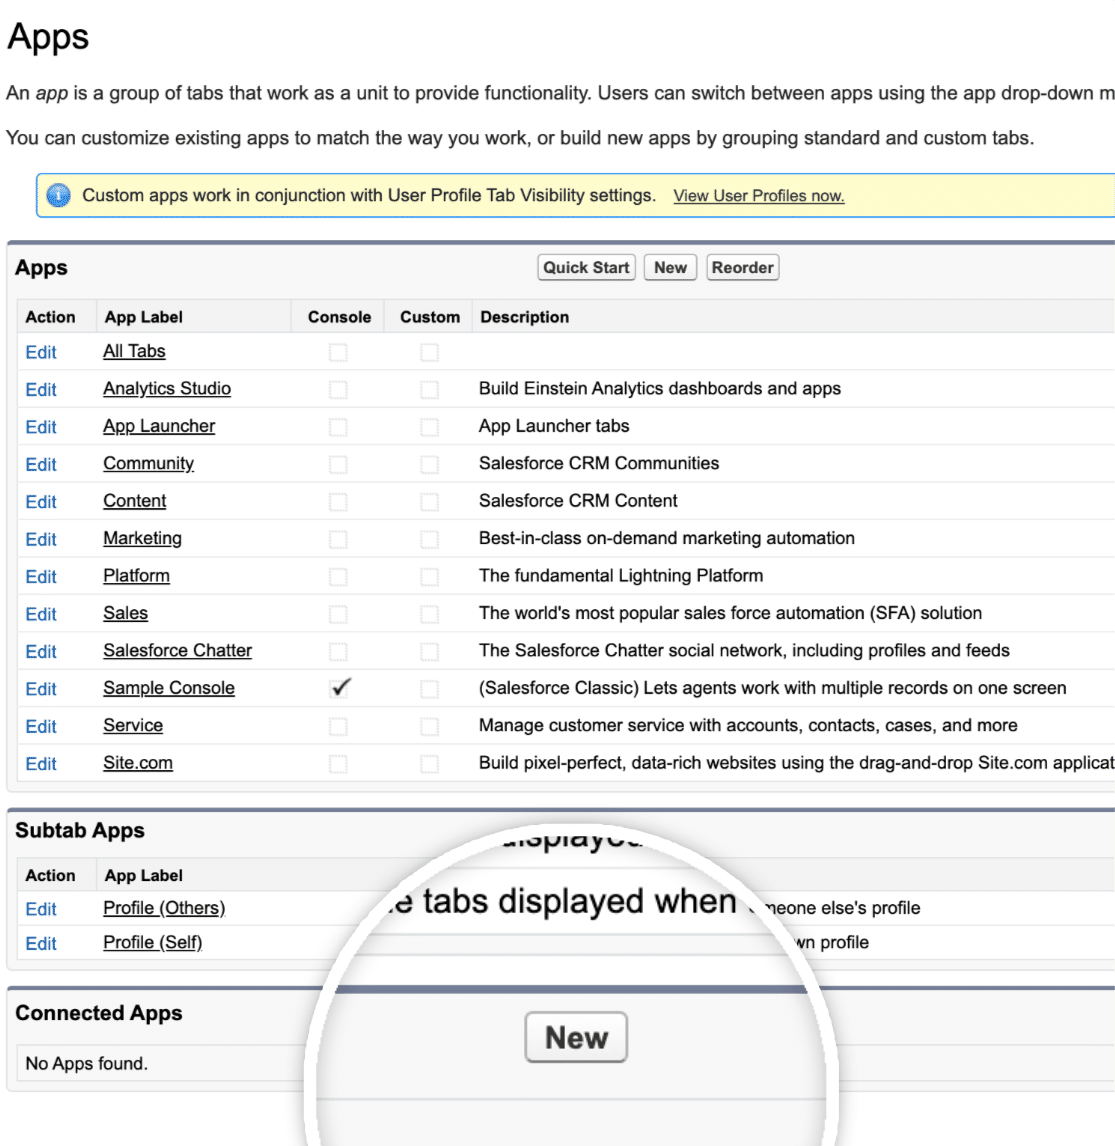
Now, you will be redirected to a list of available apps in your Salesforce account. To add a new connected app, you would need to scroll to the Connected Apps section and then select the New button.
Step 3 – Fill out the App Details
After you click on the New button, you will be displayed with a form. In order to start, you would need to fill out the mandatory fields and required information. The form will be about the app, so that’s not so complicated.
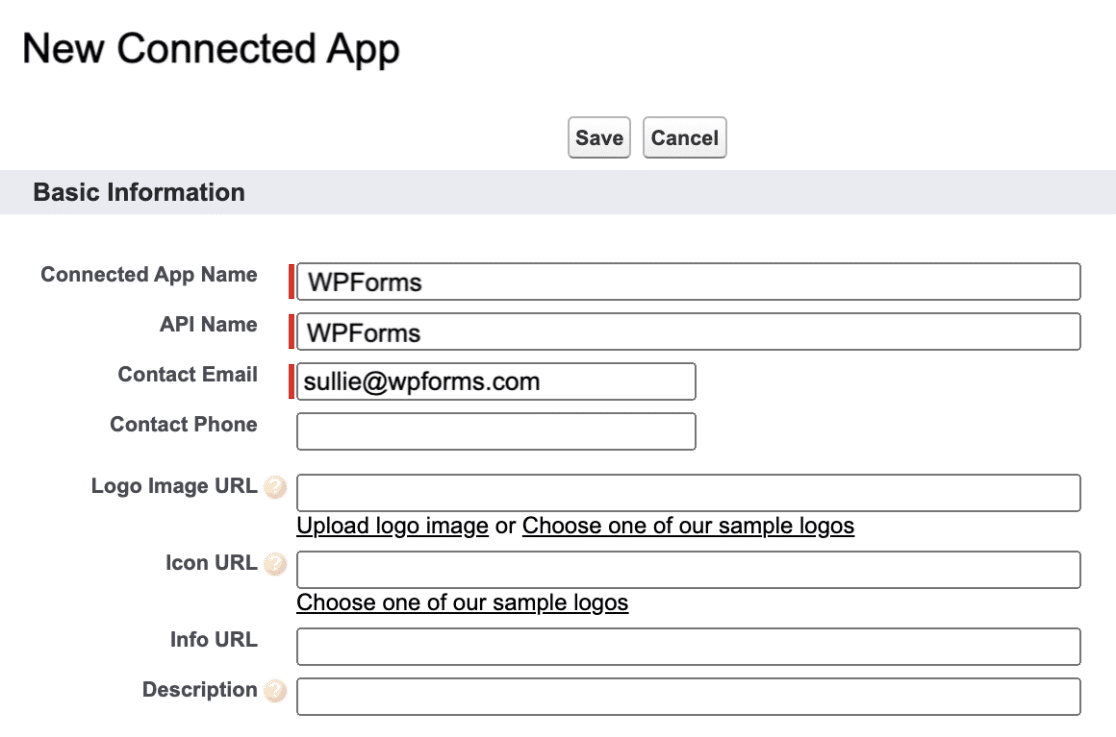
As you can see in the above image, you would need to fill out some basic information like Connected App Name, API Name and your Contact Email.
Step 4 – Enable OAuth Settings
Check the Enable OAuth Settings box in order to configure your app’s permissions. By doing this you would open up more fields and you will need to complete in order to finish the settings of your app.

Keep this tab open as the steps will continue for this tab in Step 6.
Step 5 – Call Back URL
Not heard of call back URL?.. Well, the Callback URL will redirect you after you have allowed authorization for the apps that are connected to your account. Not sure where to find?. Let me help you, To find the Callback URL, the first step is to open the WPForms in a new tab. Now go to Settings→Integrations and click on the Salesforce integration.

There you can find the Add New Account button.

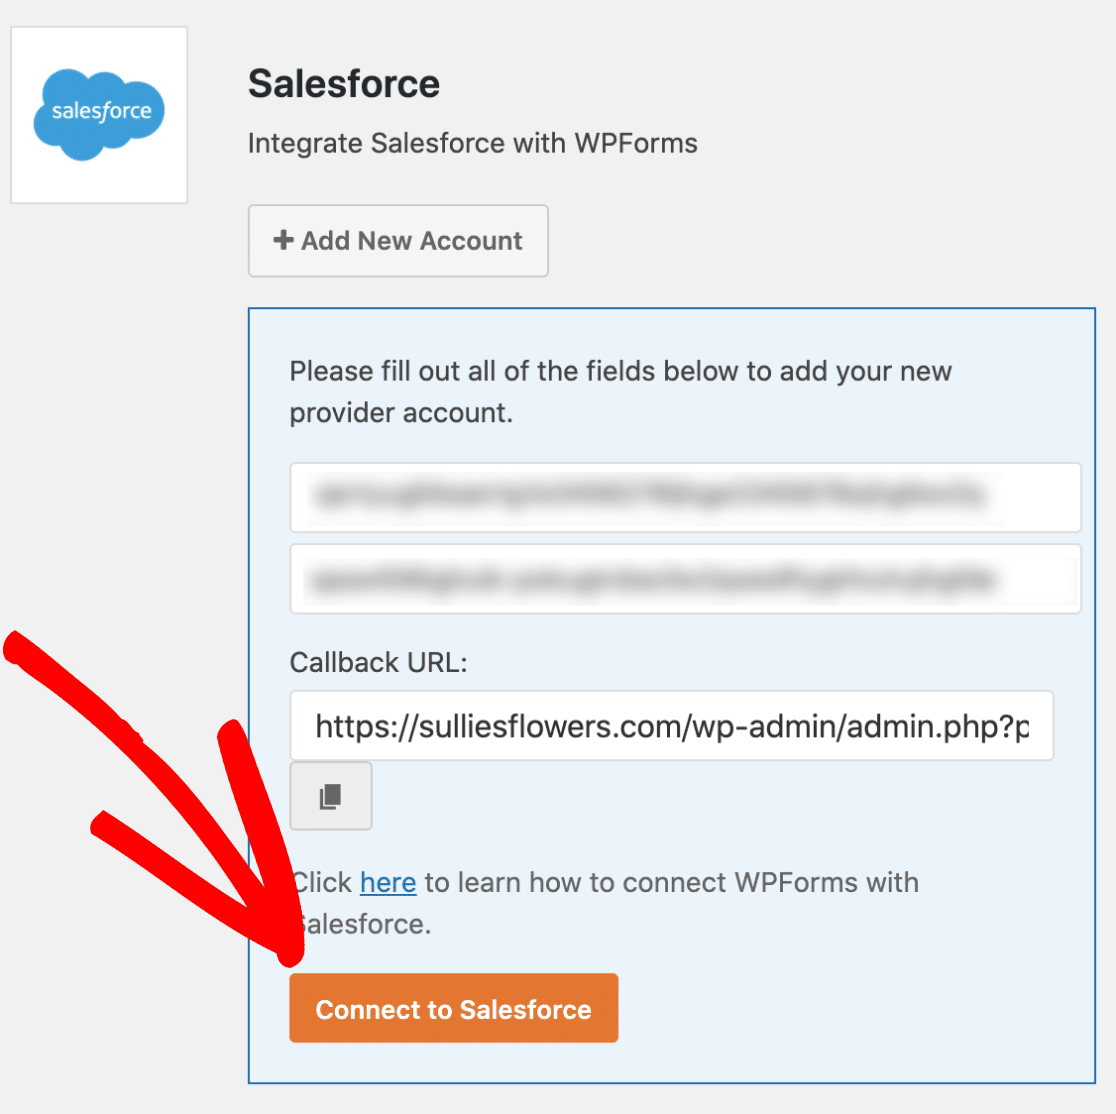
Click this button so that you would get to see the integration settings, which also includes the Callback URL for your website.

Go ahead and copy the Callback URL. After completing the steps, keep this tab open and we will continue the steps in Step
Step 6 – Select the OAuth scopes
In this step, Add Access and manage your data and Perform requests on your behalf at any time. This selected OAuth scope tells Salesforce what permissions your app should provide. You can add these permissions by selecting each option from the column on the left. Now click the Add button.

Once you have added the permissions, scroll down to the bottom of the page and click on the Save button. This will complete the setup process. If everything goes god, then you should be redirected to a page with a notice Allow 2-10 mins for your changes to take effect on the server before using the connected app.

I suggest you wait for 10 mins before continuing. If you do that, then there will be no issue when you continue with the next step.
Step 7 – Connecting Salesforce to WPForms
You’ll need to copy Consumer key and Consumer secret in order to connect Salesforce with WPForms. Wondering where to find the consumer key?. You can find your consumer key directly under the API information within your app’s profile.

Step 8 – Connect to Salesforce
Now go back to Step 5 and Copy-paste your consumer key and the consumer secret into their respective field. After you paste those, Click on the Connect to Salesforce button.
Step 9 – Login and Allow access
After you click the connect to Salesforce button, you will be redirected to your Salesforce login. Now you will have to log in one more time. After the logging in process, Salesforce will ask you would like to allow access to your account. Now go ahead and click the Allow button to finish the setup process.

Once you have completed the process, you will be automatically redirected to your integration page, where you will see the success message.
Step 10 – Creating WordPress Form
All set!!!.. Your salesforce account is successfully linked and you are ready to connect it with your form. All you have to do is start creating a new form, or edit an existing form. From your form builder, you can add a new Salesforce connection for your form by going to the Marketing→Salesforce. From there, You will need to click the Add New connection button… Then follow the instructions given to you. WPForms helps you create in simple steps. Check out the WPForms, if you are new with the below link.
There you go, Now you have learnt How to Connect WordPress Website Leads And Salesforce (CRM). To see more articles on Tech, Travel, WordPress and more Do Follow my Newsletter.
Like this Post? Do share it with your friends
Continue reading my posts on-
- How To Collect Paypal Payments on your WordPress site?
- How To Create an Engaging Multi-Page Form with WPForms
- The Best Survey Software in 2020
- How to Create a WordPress Order Form With Online Payments
- How to Create a Calculator in WordPress Website
- Life Is Hard than we Think!
- How to Install Google Analytics in WordPress by MonsterInsights
- Travel, Thunderbird and Coffee
- How to Set Display Rules in OptinMonster


Leave a Reply