Hey everyone, this post will explain to you about How to set Display rules in OptinMonster… But before that, you should take a Look at the article How to Create a Popup Coupon that Boosts Sales so that you will get an Idea How to setup OptinMonster on your website. Remember this post is after installing the OptinMonster Plugin.
List of Contents
OptinMonster?
OptinMonster is one of the best lead generation software that helps you to boost your online eCommerce sales and also your email-list. You could have heard about OptinMonster if you are a professional web-designer. It can draw more customers and increase your sales to a new peak. So if you are planning to download and start using OptinMonster, Check the below link…
Alright, let See How to set Display Rules in OptinMonster.
How to Set Display Rules in OptinMonster
After setting up OptinMonster on your website, follow the below steps to play with the Display rules. For example, let’s just assume that we are setting this display rules after creating the Popup coupon which I have mentioned above in this as a reference… Normally after you publish your coupon popup, your display rules will be in the default display settings. It actually works great but if you are planning to go for an extra mile for your customers you should probably edit the display settings.
These display rules can be used to greet a customer when they arrive on your website or you can try to retain customers who are leaving your website. In this article, let me tell you about both. To start doing this go to your campaign’s dashboard →Display rules.

After clicking this, we will first see How to welcome or greet your visitors with the OptinMonster…
How to Greet your Customers with OptinMonster?
Alright, Now after you entered into the Display rules you will get to see your popup campaign’s default rule which is After X seconds. Wondering what is this X Seconds?. Let me tell you, it is one of the default rules which ensures you that the visitors always see your campaign after they have been on your website. But in order to reach the audience fast and aggressive.
It’s not a tough deal!!!. You have to make some little changes to your default settings. To do that, follow me as I do,
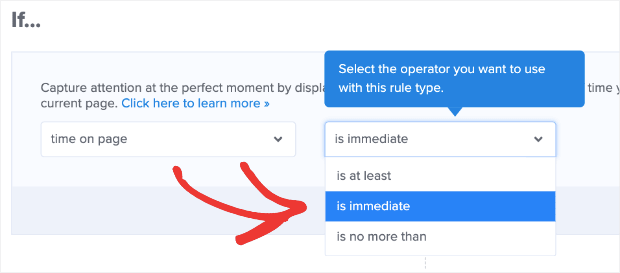
You will need to keep the condition time-on-page, in the first field. Now in the next, you will need to alter the is at least to the is Immediate.

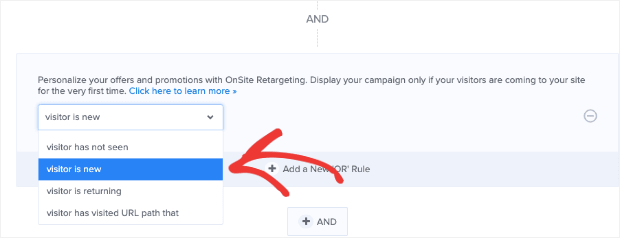
After completing this process, you will want to change your OnSite Retargeting rules to make sure you are welcoming your new customers with your coupon. This could be found underneath.

All set and now, you have two rules in place,
- Only new visitors will see this popup.
- When a visitor enters your website, the visitors will automatically receive your coupon popup.
There you go, Now you have successfully learnt How to Set Display Rules in OptinMonster.. But wait!!!. There are a lot more things available. Eager to know?. Let it be an additional one. Do you know How to Capture Customers Who Are Leaving Your Site with a Popup Coupon?. well, we will see that too… Forget to tell you guys something, I suggest you click on the Save button after each change you do on your website.
How to Capture Customers Who Are Leaving Your Site with a Popup Coupon
If you are aware of the OptinMonster plugin then you would have definitely heard about their exit-intent technology, which plays a major role in converting a website visitor into a customer. With the exit-intent technology, the popup coupon appears whenever a user tries to leave your website. This can help to reduce the site abandonment, which actually helps to increase your revenue and the best part is it’s really easy to set this up.
To do that, go back to Display rules once again from the dashboard and change the first settings to Exit-detected.

Now, on the right, you can change the amount of sensitivity your exit-intent uses. It has three levels namely Low, Medium and High. If you plan to explore more, you would need to keep changing the options to choose which is better for you. There you go, you have finished with the setup.
With OptinMonster you can do a lot more and it really helps you to generate good revenue for your eCommerce store. Do get the OptinMonster now with the below link.
OptinMonster will help you to display the coupons on the specific page, on a specific date and time and so much. Do not forget to check out the features. Remember the more creative you are, you can generate more revenue. To see more articles on Tech, Travel, WordPress and more Do Follow my Newsletter.
Like this Post? Do share it with your friends
Continue reading my posts on-
- How to Start a Blog? Doesn’t know where to start?
- How to Boost Sales with Countdown Timer Popups
- WordPress.com Vs WordPress.org
- How to Install Google Analytics in WordPress by MonsterInsights
- How to Quickly Create Lightbox Popups for WooCommerce
- The Best Survey Software in 2020
- How to Create Easy Notification Bars for Your Shopify/WooCommerce Website
- Travel, Thunderbird and Coffee


Leave a Reply