In this article, let’s see How to create an engaging Multi-Page Form with WPForms through a step-by-step process. If you are new to my website then I would recommend reading this full article in order to create an engaging Multi-page form.
If not?, then you would have heard about the Multi-page Forms through my previous post on How to Create a Multi-Page Form through Formidable forms. You guys could ask me why with WPForms again?.
The answer here is WPForms is one of the few plugins I recommend on my website. You can either opt-in with WPForms or you can also start with Formidable forms. Both the plugins are great to use and it helps you to create a form in minutes.
Alright here, in this article as I mentioned earlier am going to explain How to create an engaging Multi-step form with WPForms. Before that let’s see what’s a Multi-Page Form and Why it is much needed one.
Multi-Page Forms and It’s Benefits
To the People who are new here, let me give you a short introduction about what’s a Multi-page Forms and what are its benefits.
Multi-Steps forms are nothing but breaking your form into multiple pages or multiple steps. Multi-page forms are also called as Multi-step forms here, so never get confused if I use Multi-step form in the place of Multi-page forms. Multi-step forms do increase your site’s forms conversion rate and help you when you have more than three form fields.
Multi-step forms usually help us by encouraging focus by grouping form questions so that you can break down information into areas of focus for the user. Other than encouraging focus, you could also reduce the Form Abandonment and collect what you need with the help of the conditional logic.
The forms like survey Form, Order form, Poll form, Job application form, or a Request for Quote form are quite longer than a simple contact form, and that’s where you tend to use the Multi-page forms. With WPForms you get everything pre-designed which saves you a lot of time. Check out the WPForms with the below link.
With all these features your audience would more likely complete your form with the information you want. So, whether you hold an Online business or a survey website, your audience would take the time to complete the whole form rather than avoiding it. That’s how Multi-step form Works!!!.
Now, Let’s see How To Create an Engaging Multi-Page Form with WPForms.
How To Create an Engaging Multi-Page Form with WPForms
Let me make it easy for you with the Step-by-step procedure of how to create a Multi-Page form with WPForms. I recommend not to skip any steps while creating a Multi-step form. let’s start!!
Step 1 – Create a Form in WordPress
To start creating a Form in WordPress, the first thing you have to do is to install and activate WPForms. After installing it, go to WPForms from your dashboard and click on add new in order to create a new Form.
Now, with WPForms you can break any form into multiple-steps or parts. On the setup screen, remember to name your form and select the template you want to use, depending upon your requirements. For example, let me choose the simple contact form template.
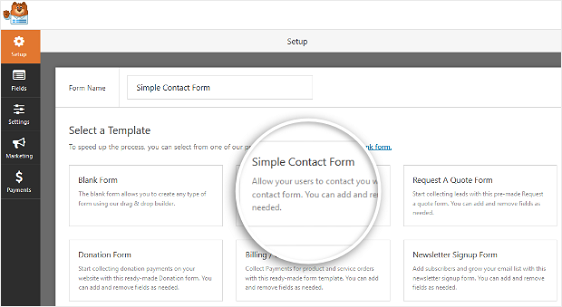
With just one click WPForms will create a simple contact form in the drag and drop builder. From this form builder area shown below, you can add additional fields to your contact form by dragging them into the places you want.
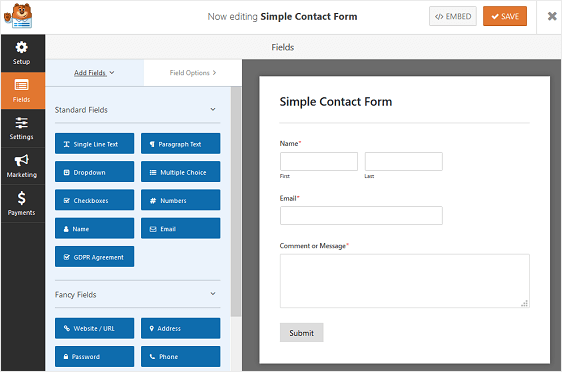
As you can see that with the basic template design you get already have default fields like Name, Email, Comments or msgs. You can also click on the form fields to make changes to the form. WPForms helps you to take advantage of the drag and drop feature so you can also drag and drop the form fields.
Multi-step forms help you when you require more information from your user side. Now, let’s see how to split your form into multiple parts.
Step 2 – Split your Form into Multiple Parts
So, to split your forms into multiple pages all you need to add the Page break form field to your site. The page break form field can be placed wherever you wish to break your form fields.
Page break field can be found under the Fancy fields. All you need to do is to drag and drop the Page break form field from left side panel to the right-side panel just like the below example.
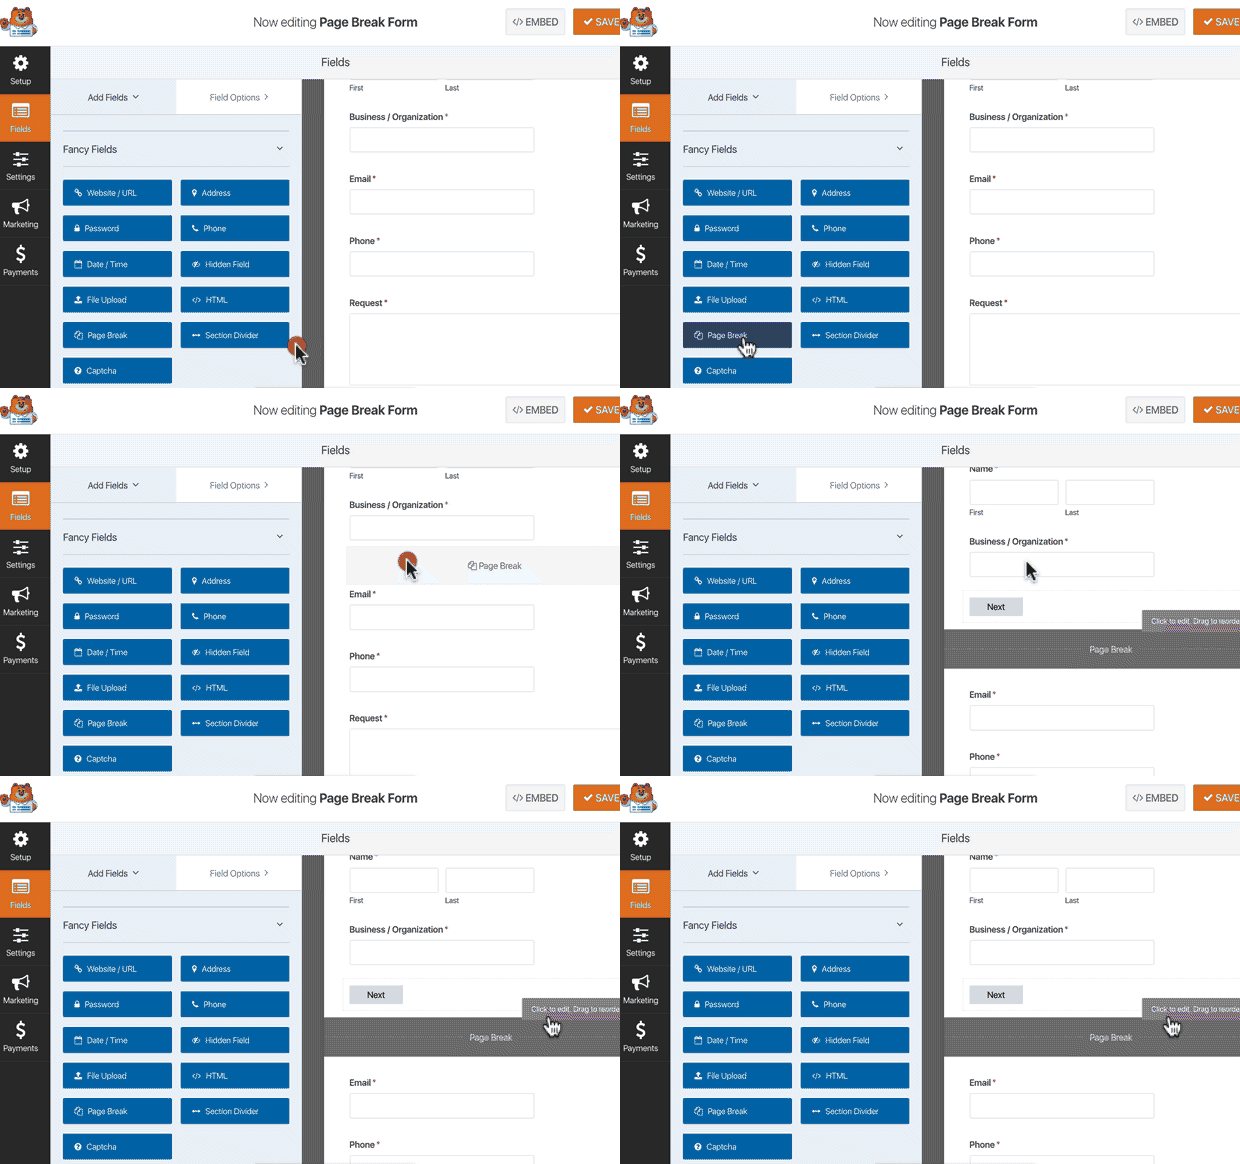
WPForms gives you the freedom to create as many form pages as you wish, but never forget that having it more can also affect your user experience. You can ask for any information that’s necessary.
Step 3 – Customize the progress bar
Progress bar allows your user to know about the different sections of your form. By showing the progress bar the users will know about where they are on your form and how much they have left to fill out before clicking “submit” on your form.
With WPForms has different style indicator bars for your multi-step forms. The first one is “Connectors” which shown a connecting bar and page titles of each part of your multi-step form. The second one is the “Circles” which show one circle and page title per page on your multi-page forms. And the final one is the “progress bar” which indicates the progress of the form as the user fills it out.
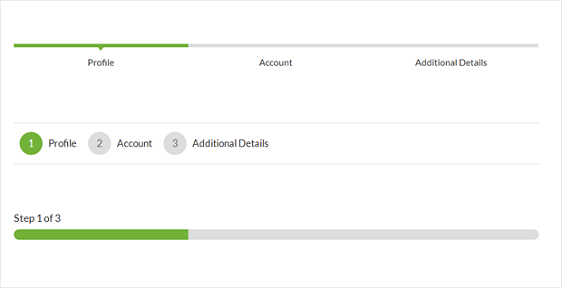
To customize the progress bar and page title of the first page of your multi-step form, click on the First-page break section.

After your select, a fresh panel would appear in the form editor where you can choose which progress bar you want to use. You can change the progress indicators colour with this editor too. You can edit your page title so the users know which part of the form they are in if you choose a circle or connectors option.

To customize the next page title and the button taking site visitors to the next page on your form, click on the page break section you created when you add the page break to your form.

You can switch on the feature that lets you show site visitors a previous page button which would help them return to the previous page if they need to.
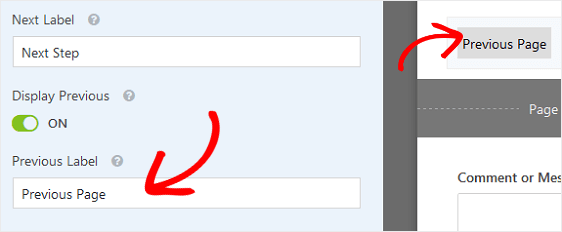
Don’t forget to click the Save button in order to save your progress with the form.
Step 4 – Configure Your Form Settings
In order to start configuring your Form, go to Settings→General.

In this setting, you can configure,
- Form Name
- Form Description
- Spam Prevention
- AJAX Forms
- Submit button text
- GDPR Enhancements.
Once you are finished with these configurations, Don’t forget to click Save.
Step 5 – Configure your Forms’ Notifications
As you know, Notifications are a great way to send an email whenever a form is submitted on your website.

With this feature, whenever a user submits a multi-step form on your website, you will get a notification about the submission. This function will be performed automatically unless and until you disable the notification from your settings.
You can also send a notification to the user’s email address when they submit a form by using the Smart tags option. This would help your users to know whether their form got submitted properly.
Step 6 – Configure your Form’s Confirmations
After the user submits a multi-step form, they should be displayed with a Form confirmation message. With this, you can send a short message to your users in order to acknowledge them with the form confirmation or you can show them a specific page on your website thanking them for their form submission or you can also redirect them to a specific URL.
To set up a simple form confirmation in WPForms, click on the Confirmation tab in the Form Editor under Settings. Now, select the type of confirmation type you would like to create. For example, let’s choose the message.

Then, customize the confirmation message as your wish and click Save.
Step 7 – Add your Form to your Website
Now, we have come to the last step which is adding your Multi-step form to your Website. WPForms lets you add your forms to multiple places on your website including your pages, blog posts and sidebar widgets.
It’s very simple, click inside the first block or the blank area below your page title and click on the Add WPForms icon.
![]()
WPForms widget will appear inside your block. Click on the dropdown and pick one of the forms which you have already created and add it to the page/ post. Select the form you just created.

Now, Publish your post or page so that your contact form will appear on your website.
There you go, Now you know How To Create an Engaging Multi-Page Form with WPForms. With WPForms you have the power to create a multi-step form without any difficult steps involved. Check out the WPForms now to avail their latest offers.
To see more articles on WordPress, Tech, Travel and more Do sign up to my Newsletter.
Like this Post? Do share it with your friends
Continue reading my posts on-
- How to collect Paypal payments on your WordPress site
- How to Create a Calculator in WordPress Website
- Thalli Pogadhey (Chennai to Pondicherry Road trip)
- How to Create Polls in WordPress.
- How to connect Stripe with Your Payment form.
- 4 Most powerful and useful WordPress Tools.
- How to Make a File Upload Form Using WP-Forms in WordPress.


Leave a Reply