Do you want to accept donations for your Nonprofit website? then you have come to the right place. In this article let’s see How to Create Online Donation Forms for Nonprofits Organization with some simple steps.
List of Contents
Online Donation Forms
If you are running a Nonprofit organization, it’s always a good idea to start accepting payments online because it helps you to reach a larger audience. Now here with WordPress, it is easy to create a donation form and accept donations from your Nonprofit organization with ease.
Some of the benefits you have when you host an Online donation form are,
- It is simple to transfer so, you can easily accept donations online. You can integrate any Payment solution such as PayPal, Stripe etc.. into your website in order to accept the donations.
- In order to stay in touch with your donors, you can simply add some 2-3 form fields through which you can collect some extra information about your donors.
- And also, Having an Online Donation form helps your supporters to donate quickly and easily.
With the help of Online payment forms, your Nonprofit organization can receive donations across the world. So, Now let’s get into How to Create Online Donation Forms for Nonprofits Organization.
How to Create Online Donation Forms for Nonprofits Organization
To create an Online Donation Form all you need is a Plugin which allows the user to create a Donation form within minutes. With WPForms you would have the power to not only create a Contact form but also you could do much more actions with ease.
Let’s see How to Create an Online Donation Form with the help of WPForms.
Step 1 – Install and Activate WPForms
To start this entire process you will need to download the WPForms plugin. Log in to your WPForms account and download the plugin. Now after you download the Zip file, Upload it to your website manually. Activate the plugin and we are good to go.
Step 2 – Create your Donation form
Now, Got to WPForms → Add New to create a new form. After you name your form, there will be templates displayed below. Select the donation Form template.

Step 3 – Customize the Form Fields
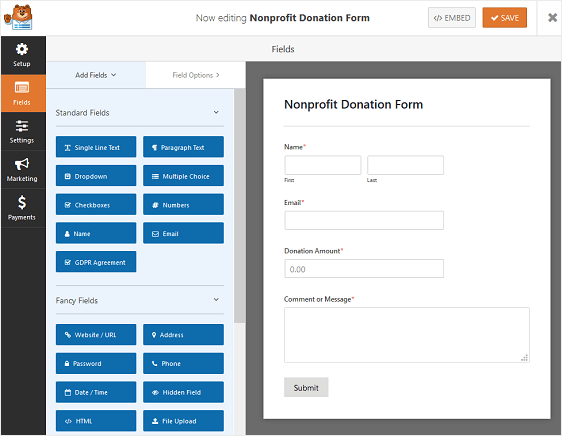
By default, your Donation form would look like the below image. You would have the fields like Name, email, Donation Amount, Comment or Message.

You can also make changes by rearranging the fields and by adding additional fields to the Donation Form by dragging the required fields through your form builder.
To add multiple-choice payment field, click the Multiple items button under Payment Fields. You can also drag and reorder the fields so that the Multiple items are directly above the Donation fields.

Now, you can click on the multiple items field in the form preview to change the options. Now with this, you can enter whatever amounts you want, and an “Enter amount” option. You can also name the label as “Donation amount”.

Click the single item field to only display when the “Enter Amount” option is selected. Click the single item field to edit the options. Do Make sure the “Required” checkbox is not checked because it will prevent users from submitting the form if they selected a donation amount in the multiple-choice field.

Don’t forget to save the changes once you have finished with the form fields.
Step 4 – Configure your Forms General settings
In your Donation form, you can configure details like Form Name, Form description, Submit Button text, Spam Prevention, Ajax Forms, GDPR enhancements. Once you have finished with these settings Click the Save button.

Step 5 – Configure Your Form’s Notifications
To stay updated on all the donations made on your website, you should enable the Notifications to on under the settings menu. By default, this option would be on, but in case if you think of customizing this option you can check this under the Notification in the settings.

Step 6 – Configure Your Form’s Confirmations
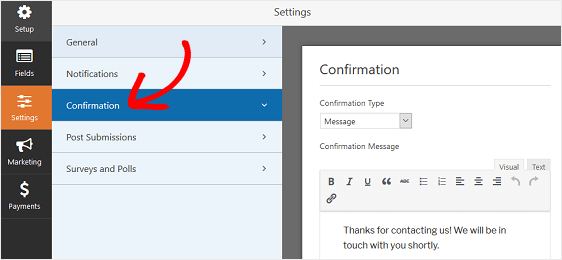
With the Confirmation tab in the form editor settings, you can send a confirmation message to your website visitors once they submit a donation form on your website. You can notify them through a message, or by showing a specific page or redirect them to a URL.
Alright, let me give you a glimpse of how to set up the Form confirmation in WPForms so you can customize the message visitors would see when they submit a Donation form.
To start, click on the Confirmation tab in the Form editor under the Form builder settings. Now select the type of confirmation type you would like to create.

That’s it. Now click the save button when done.
Step 7 – Configure your Form’s Payment settings
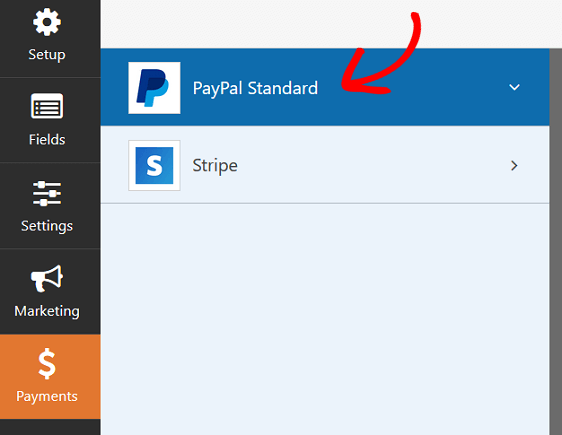
WPForms integrates with both PayPal and Stripe for accepting payments. You can install and activate the respective add-ons from the WPForms Add-ons page and follow the instructions. After you do that, Click the payments tab in the Form Editor and configure it with the details required.

Now save the settings and insert the form on your donation page using the WPForms Block.
There you go Now you Know How to Create Online Donation Forms for Nonprofits Organization.
With WPForms
You can also combine your donation forms with your favourite email marketing services like Mailchimp, Aweber, Drip etc… With this, you get the chance to add donors to your email list and keep them updated about your donations and your general newsletters.
As I mentioned above, WPForms has a Pro version and also a lite version. Check out the below link to claim the latest offer’s from WPForms.
To see more articles on WordPress, Tech, Travel and more Do sign up to my Newsletter.
Like this Post? Do share it with your friends
Continue reading my posts on-
- How to Connect Stripe with Your Payment Form.
- WordPress.com Vs WordPress.org
- How to Create a Calculator in WordPress Website
- 4 Most powerful and useful WordPress Tools
- How to Build Spam-Free WordPress Contact Forms
- Thalli Pogadhey (Chennai to Pondicherry Road trip)
- How to Create a Quiz in WordPress website.
- How to send Confirmation emails on your WordPress website.


Leave a Reply